![](https://blogger.googleusercontent.com/img/b/R29vZ2xl/AVvXsEjKv5mkHfvNYrk4XcgiBZR0TIeWovUMg_IzNsVqRHxreltsIyibh2R3KzU9XB_K17mwBwg-U6aiPExAhvRDo4oXITvfo-BZBqIW93nmX8le1iLDn8iPzHSNmowILTsBuRCgH-S7AyXfZc4K/s400/MakeAPhotoMoreContrastive450x250.jpg)
This tutorial will show you how to turn a normal image into a contrastive one!
Step 1: First download the original photo below:
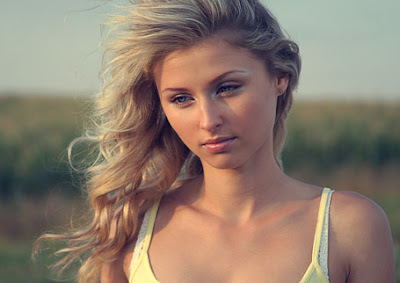
![](https://blogger.googleusercontent.com/img/b/R29vZ2xl/AVvXsEjW-GyZ6SiP3RtZ0ZvZlfsdoEGSMwxyUJnoYTP57Vgh9TE0UhbbsaFChGdKXeSsOc5oNTvewiKHgon7z7EN751GutDxFLEgm1SZEiQF4E543wi_2r_jFE_tZ67cRVu52iMGjuCrVMMnHag5/s400/MakeAPhotoMoreContrastive1.jpg)
Step 2: Next we use some popular tools to adjust its contrast and brightness like Curves tool (Image>Adjustments>Curves)
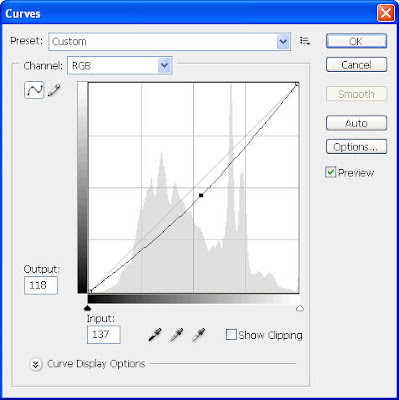
![](https://blogger.googleusercontent.com/img/b/R29vZ2xl/AVvXsEit1dvukjJTd0XEctdeMWpRo_x1WVpqiWZ_Kn-Vh3EErHESMtcWFEuhJ_fLKRP8RY_JY7S3Yhkcx-qQhV-AMFFWC3ram1w2TcRecin5Wv6dLpWZZyt5apt6HQCADojk6ExtlI2kAfNiS7fB/s400/MakeAPhotoMoreContrastive2.jpg)
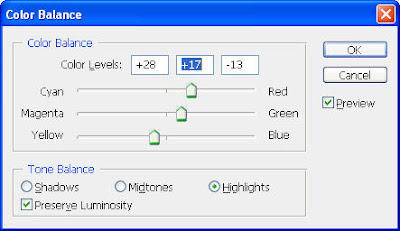
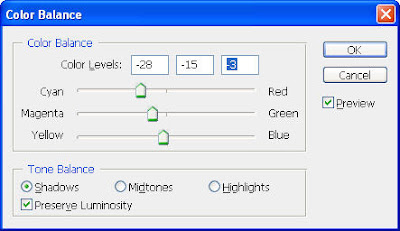
and Color Balance (Image>Adjustments>Color Balance) with these settings:
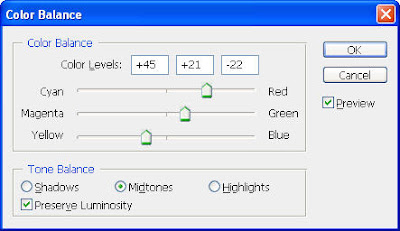
![](https://blogger.googleusercontent.com/img/b/R29vZ2xl/AVvXsEjNhfhx72riSOCdtQGsqYR1-KKFpwXuT7d7gRU3lCz053vbClBrRRAfh3vtvGMKuMhADaSwtO60xZts478aTA0YgNqBaaqii_pXX37vtJrSYBp7BmoRhCzsx0C7BTNNbtwo3ABZfldha18y/s400/MakeAPhotoMoreContrastive3.jpg)
![](https://blogger.googleusercontent.com/img/b/R29vZ2xl/AVvXsEirfhkRekHCtPNX3d71FH1TbmZrNnhrvxC0vrZ-hscgcMFYzho5TBTkTr6BfhbHrvwimOuEbe7RivOcO6bk4fJqmyNHPnkeBsOVSlDkUlgdmK3WOqNoysRn35moWglaGNtV4q9FpN4bruSI/s400/MakeAPhotoMoreContrastive4.jpg)
![](https://blogger.googleusercontent.com/img/b/R29vZ2xl/AVvXsEiW-zCnTUj-YixYDDuV3meIMwxh0JyynbYFnlhh1gQbcYVUI-Hy296Vb7KaFyZaXanm5AL5S3f6-B4gtr2XBOT2w-9_Zcxof8YOaEoXhc4Oou_sE5JTdWNMD8JSJ65ZOMs9w1JH83_I7SYO/s400/MakeAPhotoMoreContrastive5.jpg)
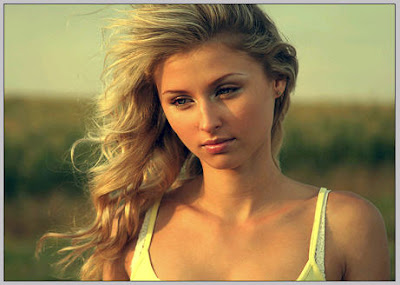
Our photo now looks like this:
![](https://blogger.googleusercontent.com/img/b/R29vZ2xl/AVvXsEgnQ-rOEl-8Sz-8bmoMNijdERByVT3cPyb2a_BIsfqWMuKvVdh2LTzmx8He108I-5e5672GadtNBlfbK-kgo9l0CmUzFL0ih7tOhdNXAkfsrz_g3S6wOfTpbBzjfUXj3wOP0JVBGsXV8wEL/s400/MakeAPhotoMoreContrastive6.jpg)
Step 3:Duplicate your photo (Ctrl-J) and go to File>Blur>Gaussian Blur and choose a radius of 2 pixels to blur this layer a bit
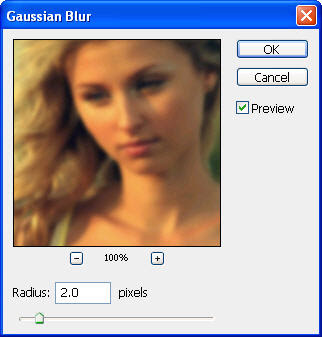
![](https://blogger.googleusercontent.com/img/b/R29vZ2xl/AVvXsEhYe3y-ZRrlOizwQ9F09oYM2NuMtpF9F9oguMNRGP9sfRCRJCGmu5Cj8jGTh54al0afSybqc9FC4HiakixRs7OQ5c99kd-yqYwaAX2SKe1q46-YLLHVZbO2pBHjoeGWou5i7hIp7P873gdi/s400/MakeAPhotoMoreContrastive7.jpg)
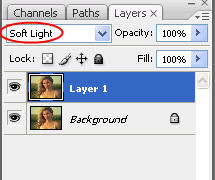
Step 4: Then from the Layers tab, change the blending mode of this layer to Soft Light
![](https://blogger.googleusercontent.com/img/b/R29vZ2xl/AVvXsEhYhv0YT7_SvA_0qF3Fq1121Y5UmK-o6B4EH-Wadiy4rGzjUForlBpS-EumqR1dwe5krLF4SITsQJzoY7wq5N0mLh969g_Io43e9j5wyIGcO3UewRzJwsansQUXq9-4_UH_hoxFXg5Cg3hI/s400/MakeAPhotoMoreContrastive8.jpg)
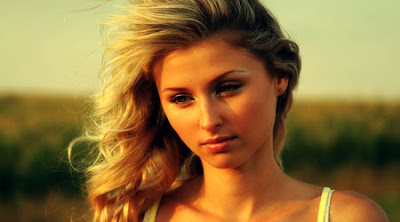
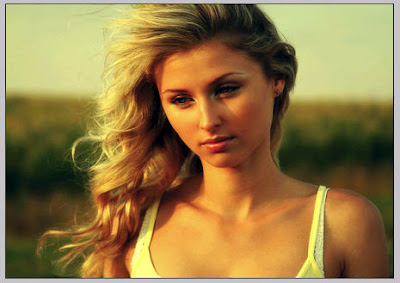
And your photo will become more contrastive like the photo below:
![](https://blogger.googleusercontent.com/img/b/R29vZ2xl/AVvXsEib4rNucq_l8y1gcjg7Iu-22OrcDxVElG2v1T-5bqr8UHehAddqqF0jLPuioSZakkP9THRWYOUh20FYTLDPDM96ZQAEBe-OtMqgx9erfomm7_4_VZap9GRZuLCnUozSvxJnwVCKWPlf0SeI/s400/MakeAPhotoMoreContrastive9.jpg)
This method is commonly used to emphasize something you want on a photo by making it more contrastive with the background. The model now looks lovely and lively!
Posting Komentar