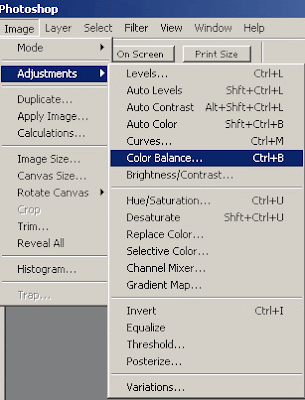
There are basically two ways to do things. Adjustments and adjustment layers.
1. You can create an adjustment on an actual layer itself (by going under Image: Adjustments: and then choosing an adjustment). Note: adjustments will not work on shape layers (vectors). In this case you'll want to make duplicate the original layer before you make any adjustments or changes.
2. You can create an adjustment layer on top of an original layer. This preserves the original layer, as you can easily discard the adjustment layer.
If you are a beginner, you'll want to be careful. Always make sure that if you are making an adjustment on a layer itself that you are certain you want to keep that adjustment. To play it safe you should always duplicate the original layer if you are going to make adjustments or try out some filters. But you can easily just create an adjustment layer instead by clicking on the adjustment layer icon on the bottom of the layers palette.
When you create an adjustment layer, it will apply to all of the layers beneath it. For example if you had 20 layers of a complex design and wanted to change the color balance of all of the layers (the entire document) you would select the top layer in the layers palette and then create an adjustment layer: color balance and then it will apply to all of your image. You can move that adjustment layer down and layers on top of it in the palette won't be affected. Remember that it applies to all of the layers beneath it.
What I have just talked about is creating an adjustment layer that will spread across the entire space of the document. Because you have not made a selection, an adjustment layer will spread across the document on its own special layer. If you make an adjustment ON a specific layer, it will just apply to that layer.
Now..if you want an adjustment layer to apply specifically to a certain layer (instead of the entire document) for the same effect as creating an adjustment on the layer itself; what you have to do is simply Ctrl or Cmd click on the layer icon and get the layer selected so you see the marching ants. Then what you do is simply create an adjustment layer of your choice (from the icon) and it will only apply to the selected areas of the layer immediately beneath it (because no other layers are in between it).
This is the same effect as creating an adjustment on the layer itself except more flexible because you can easily adjust the adjustment layer attributes (by double clicking on the adj. layer) or simply throw it away or hide it if you don't like it. You may want to consider trying different adjustment layers on a layer but remember you have to select the layer itself first otherwise the adjustment layer will apply across the entire document.
You may also have to do some layer masking as certain adjustments will create harsh and distinct differences from the rest of the document. Remember there are these two ways to do the same thing but if you can get comfortable with creating and using adjustment layers, they are going to save you some time. Consider putting several layers of adjustments in a layer set for better organization. I personally use adjustment layers all of the time and they are used religiously in designs such as movie posters and flyers.

Posting Komentar