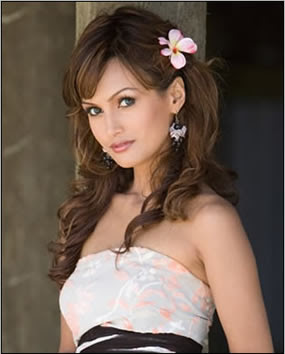
Step 1: First I will start with an image.
![](https://blogger.googleusercontent.com/img/b/R29vZ2xl/AVvXsEh51NrmMzLbrmBbMsykPbGP2FiDJNWu5wd333HcWZTG9LmfGWgHvwAnu2iEa8XHo0S1knK_P46cpkVvxaxLRXfRTkyTqyCNUnjMrwU5u3CfEr81jHGgmnITLkz_oyDJl_y_4AS0tUbTTpFh/s400/Vector-1.jpg)
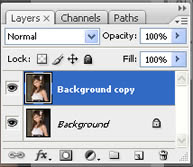
Step 2: Duplicate the Background layer.
![](https://blogger.googleusercontent.com/img/b/R29vZ2xl/AVvXsEjGwoV1ZLwgVWpZpLUmO9AUmcgcauMshlsqbrsmhPRtzYsw7P-IVD317AgMHb2_5gTLByP9SG7d1kHfO8Keo7s9Cb8_fSpB4GICbQR1yUZ1XvSiLN9v2aOn6PH49z-i1ruyX9uDHTgy8TdW/s400/Vector-2.jpg)
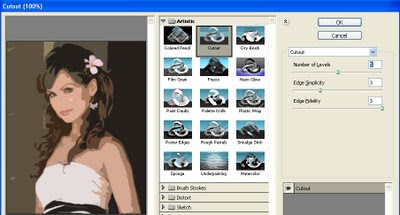
Step 3: Now apply the Cutout filter (Filter => Artistic => Cutout). On the left side the amount of detail in the vector can be controlled by adjusting the Number of Levels, Edge Simplicity and Edge Fidelity sliders. For this example I am using 5 levels, with the Edge Simplicity set to 3 and Edge Fidelity set to 3. Click OK.
![](https://blogger.googleusercontent.com/img/b/R29vZ2xl/AVvXsEhtxjbabsFnjtRWXePEv0wvuzTUgfDC_Hu3VQnvPi503Nu99PPvst_GgBrwo9GF3ptRw4EBnlON46rTi6XnsrlJ4C74ZWO8NsPibvlLx7-8Sx_Ud7bbd0lDJy1ctpg2eKLqkYPY60i9GngH/s400/Vector-3.jpg)
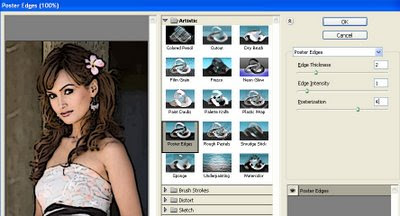
Step 4: You can trace the areas of color divided by the Cutout filter with the Poster Edges Filter. For this example the Edge Thickness is set to 2, Edge Intensity to 1 and Posterization to 4. Click OK.
![](https://blogger.googleusercontent.com/img/b/R29vZ2xl/AVvXsEhLkKVEh2GYWv65ayBF3Zunj7hqSJp3Zu_Chb_7wVxsA5CRmBc7ykV4R1Nm58JnSzhs6YTfKNxglLM7Yfu3G10tM7MJIyUHbaOHEoH_TX1SFfKgXhoCQeazzBlrsgHCCTlBYpCrNXy37PmI/s400/Vector-4.jpg)
Step 5: The color can be changed subtly with a Photo Filter adjustment layer.
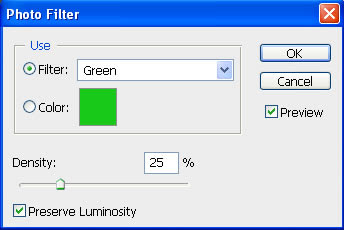
![](https://blogger.googleusercontent.com/img/b/R29vZ2xl/AVvXsEjtCBmm-C80rIcG4LnasHC47mJgw_2FKPH4LT0XITOfU2pearYxZurInIlXji1kqq5fxp8sdjSeuLr4KbIM-10KVuY4tp_hmLI9pZ8HzC-afLV1AGZLdenr2fwnPxrNSewAqU8cDe8vvfwM/s400/Vector-5.jpg)
Step 6: And finally, to add to the 'colored' effect, a Brightness/Contrast adjustment layer will help take away the natural highlights/shadows even more.
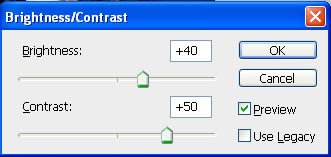
![](https://blogger.googleusercontent.com/img/b/R29vZ2xl/AVvXsEhl4fOARmj-QZCD6-xn9_jNSPIcClPy6w4xvHBosyiTqCCD3a-AY3gxALZ_r82NH6d4lYOIEg84EXdB53DC_kvox2gbzJ5A5xutzxPs0-FAeGC3FD8gVT8q_Y5_JWQM9keDWXhUW_59YWdV/s400/Vector-6.jpg)
Step 7: Here is my final vector image:
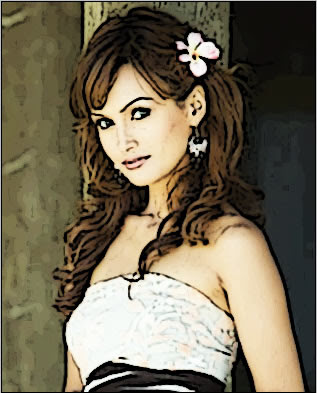
![](https://blogger.googleusercontent.com/img/b/R29vZ2xl/AVvXsEg7bJzaEVYN0beBUVPUpWTzEfcGhnkaTuh7udJ1m6xeX9QqEJ3_o_Rh3N3KvxVrqTzKn2Klz1GU3afXngEJJcbEiC_5v0SRoC49Lw_SeQNiC4-_VqwH2xdv8gJDYKlx7nQIEgMM1uFdqw3C/s400/Vector-7.jpg)
Posting Komentar